Why are product requirement documents (or PRDs) such vital tools for product teams? Because no matter how clearly you can envision your product's future state, no two stakeholders will hear it the same way.
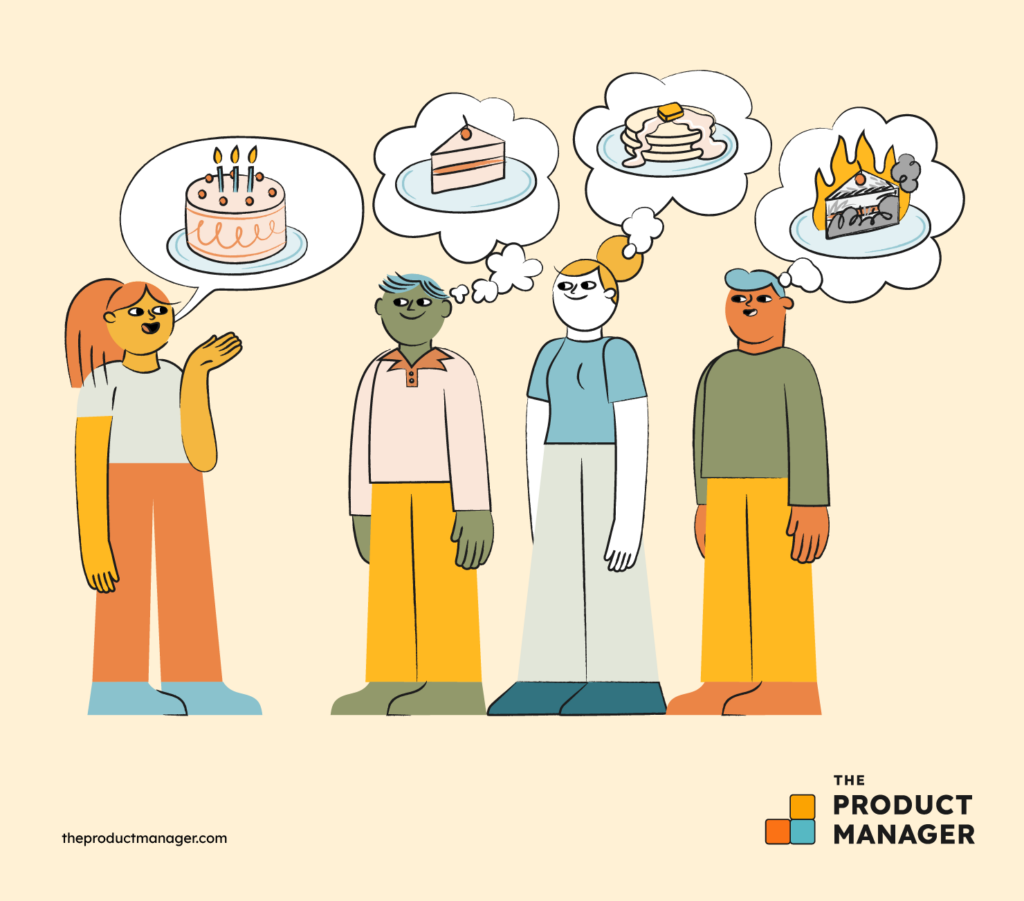
I'm sure there are a million horror stories out there from product managers who didn't realize how ineffectively they’d communicated the critical elements of a new product or feature until it was too late.
This is why a Product Requirements Document (PRD) is so important. It uses a detailed, systematic approach to get everyone aligned on what success should look like.
In this guide, we'll help you create an amazing PRD with clear objectives, requirements, and a well-thought-out game plan. Moreover, to help you save your precious time, we also have a set of LLM prompts that will generate most of the PRD for you, (or at least give you a strong first draft!).
What Is a Product Requirements Document (PRD)?
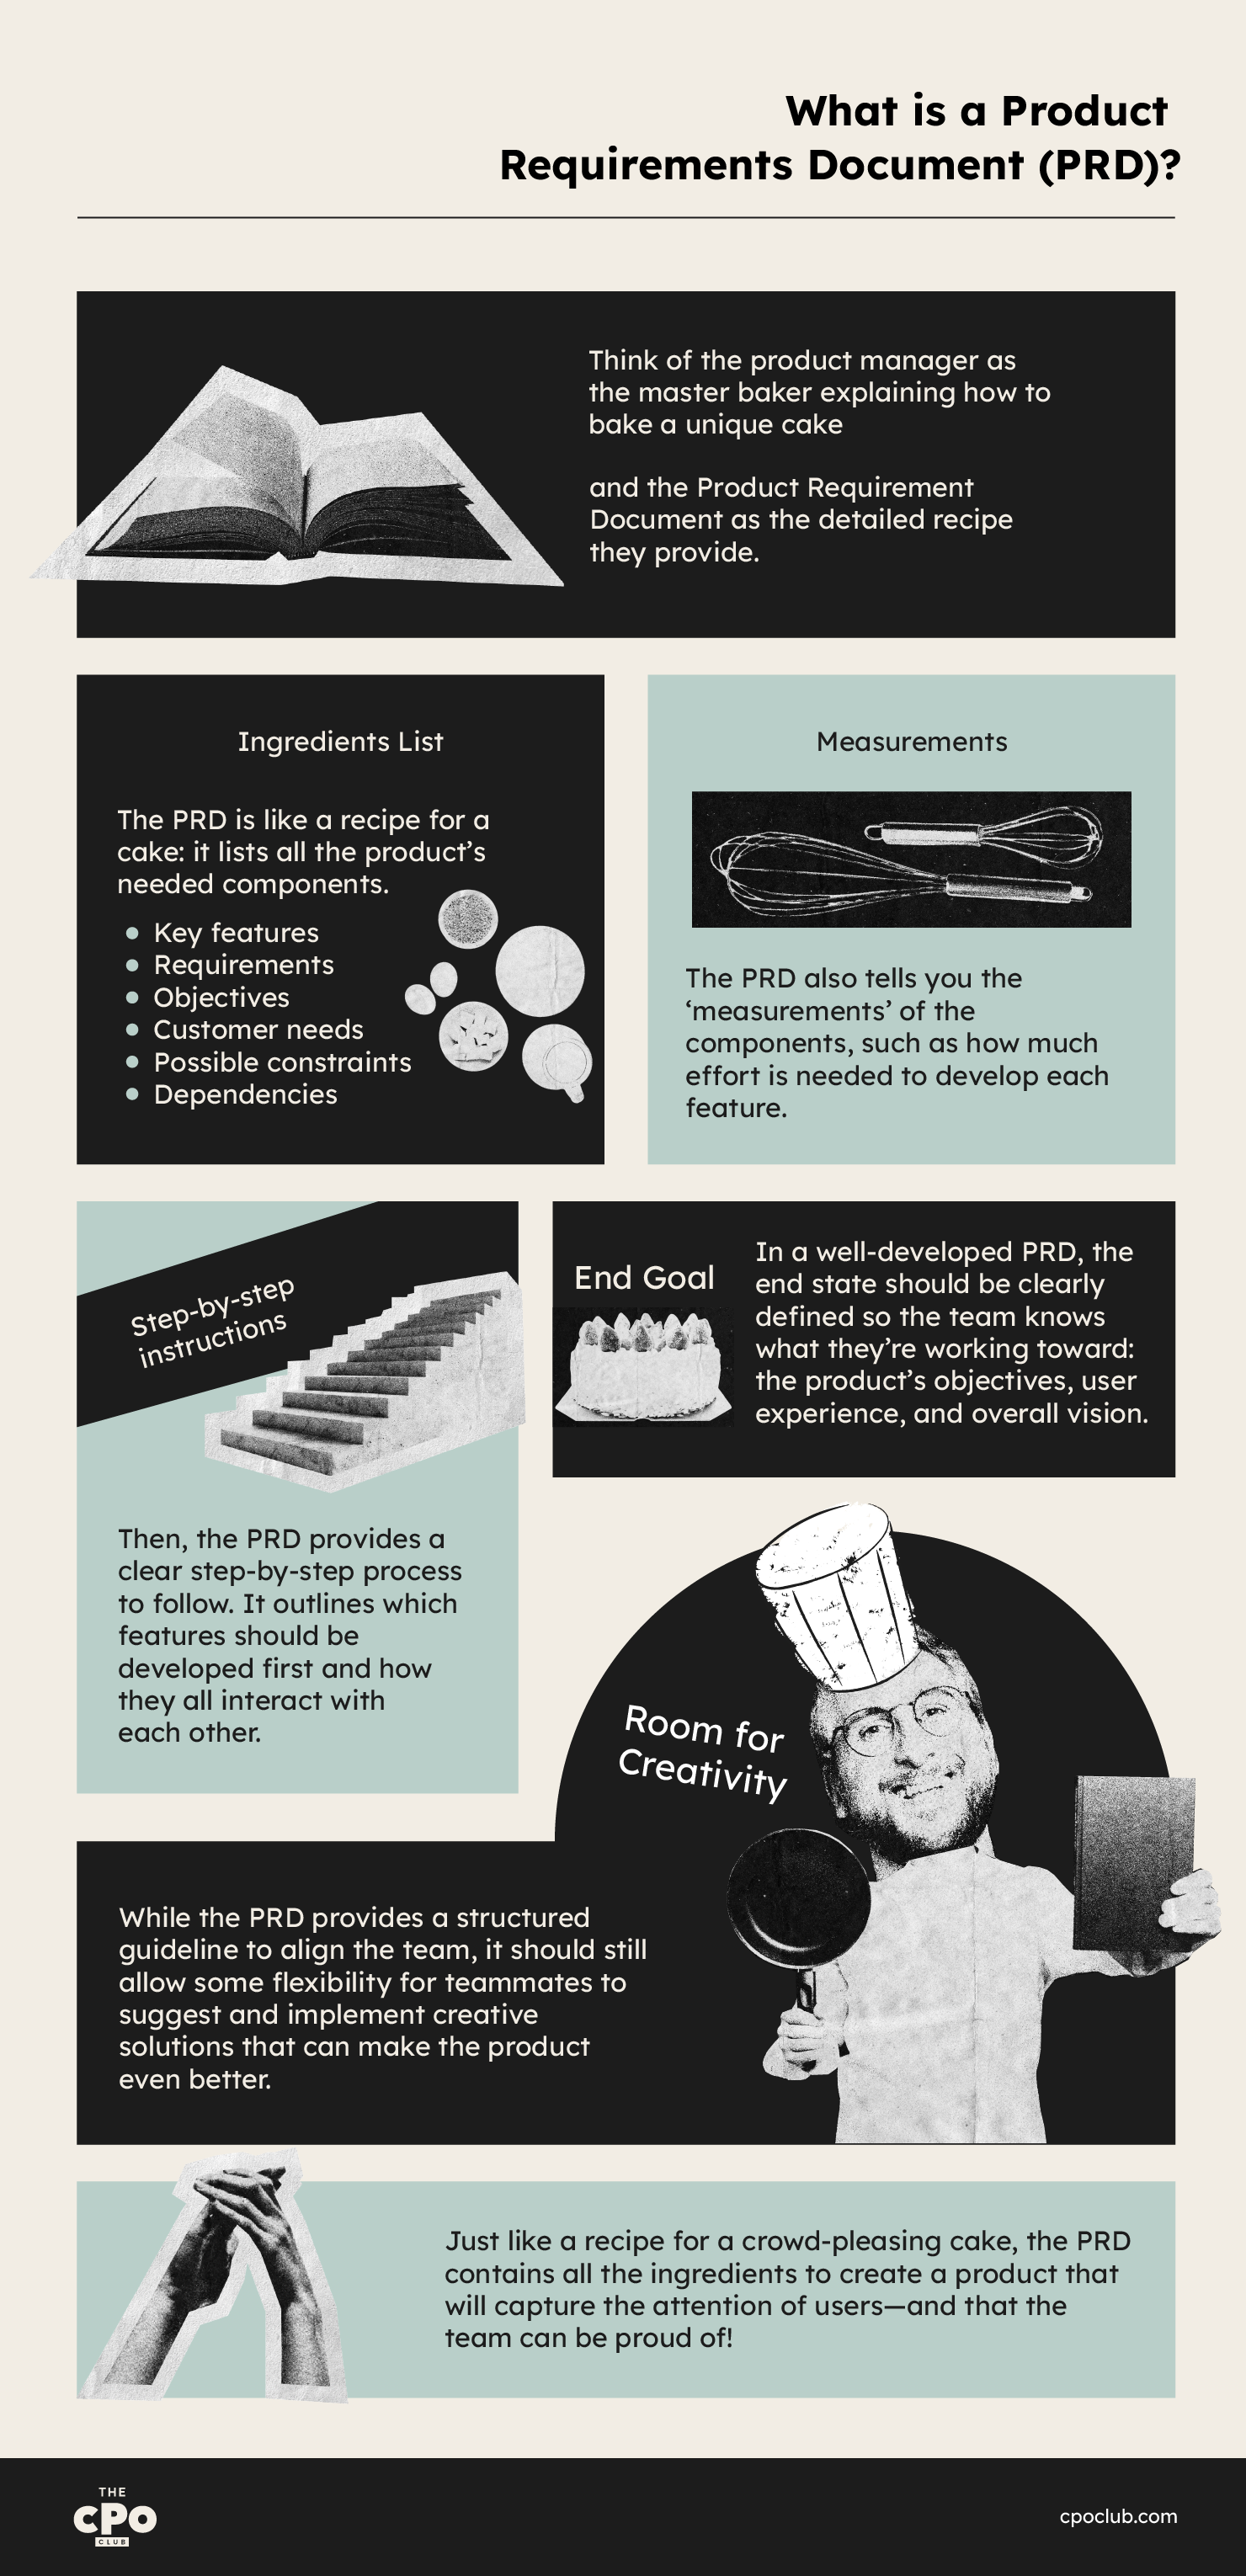
Simply put, a product requirements document details the features and functionality that must be included in a specific product release. It’s a core reference point for all teams involved in designing and developing a particular product. It's also essential for informing the product roadmap.
Traditionally used in a Waterfall methodology project environment—where the product development process is sequential—it can also be used in Agile product management.
It really comes down to this expectation from leadership on how product should be executed…what is really happening on the ground level with product managers executing and there’s this disconnect…called product-process gap, but it’s really the gap between the expectations and reality.
Several other documents can be created from the information captured within the PRD. Engineering may create a Technical Requirements Document detailing the product specifications and system requirements.
Business analysts may create a Functional Requirements Document detailing what happens when a user interacts with the system, including wireframes to show the product design.
User experience (UX) designers might create a User Interface Requirements Document that explains how the product should look and feel.
What Are the Benefits of Writing a PRD and What Does It Contain?
There are several benefits of investing time in writing a full PRD. Let’s take a look at a few of them:
- It gets all stakeholders on the same page.
- It makes it clear what’s out of scope
- It fosters collaboration between teams
- It puts the customer’s perspective at the heart of the product
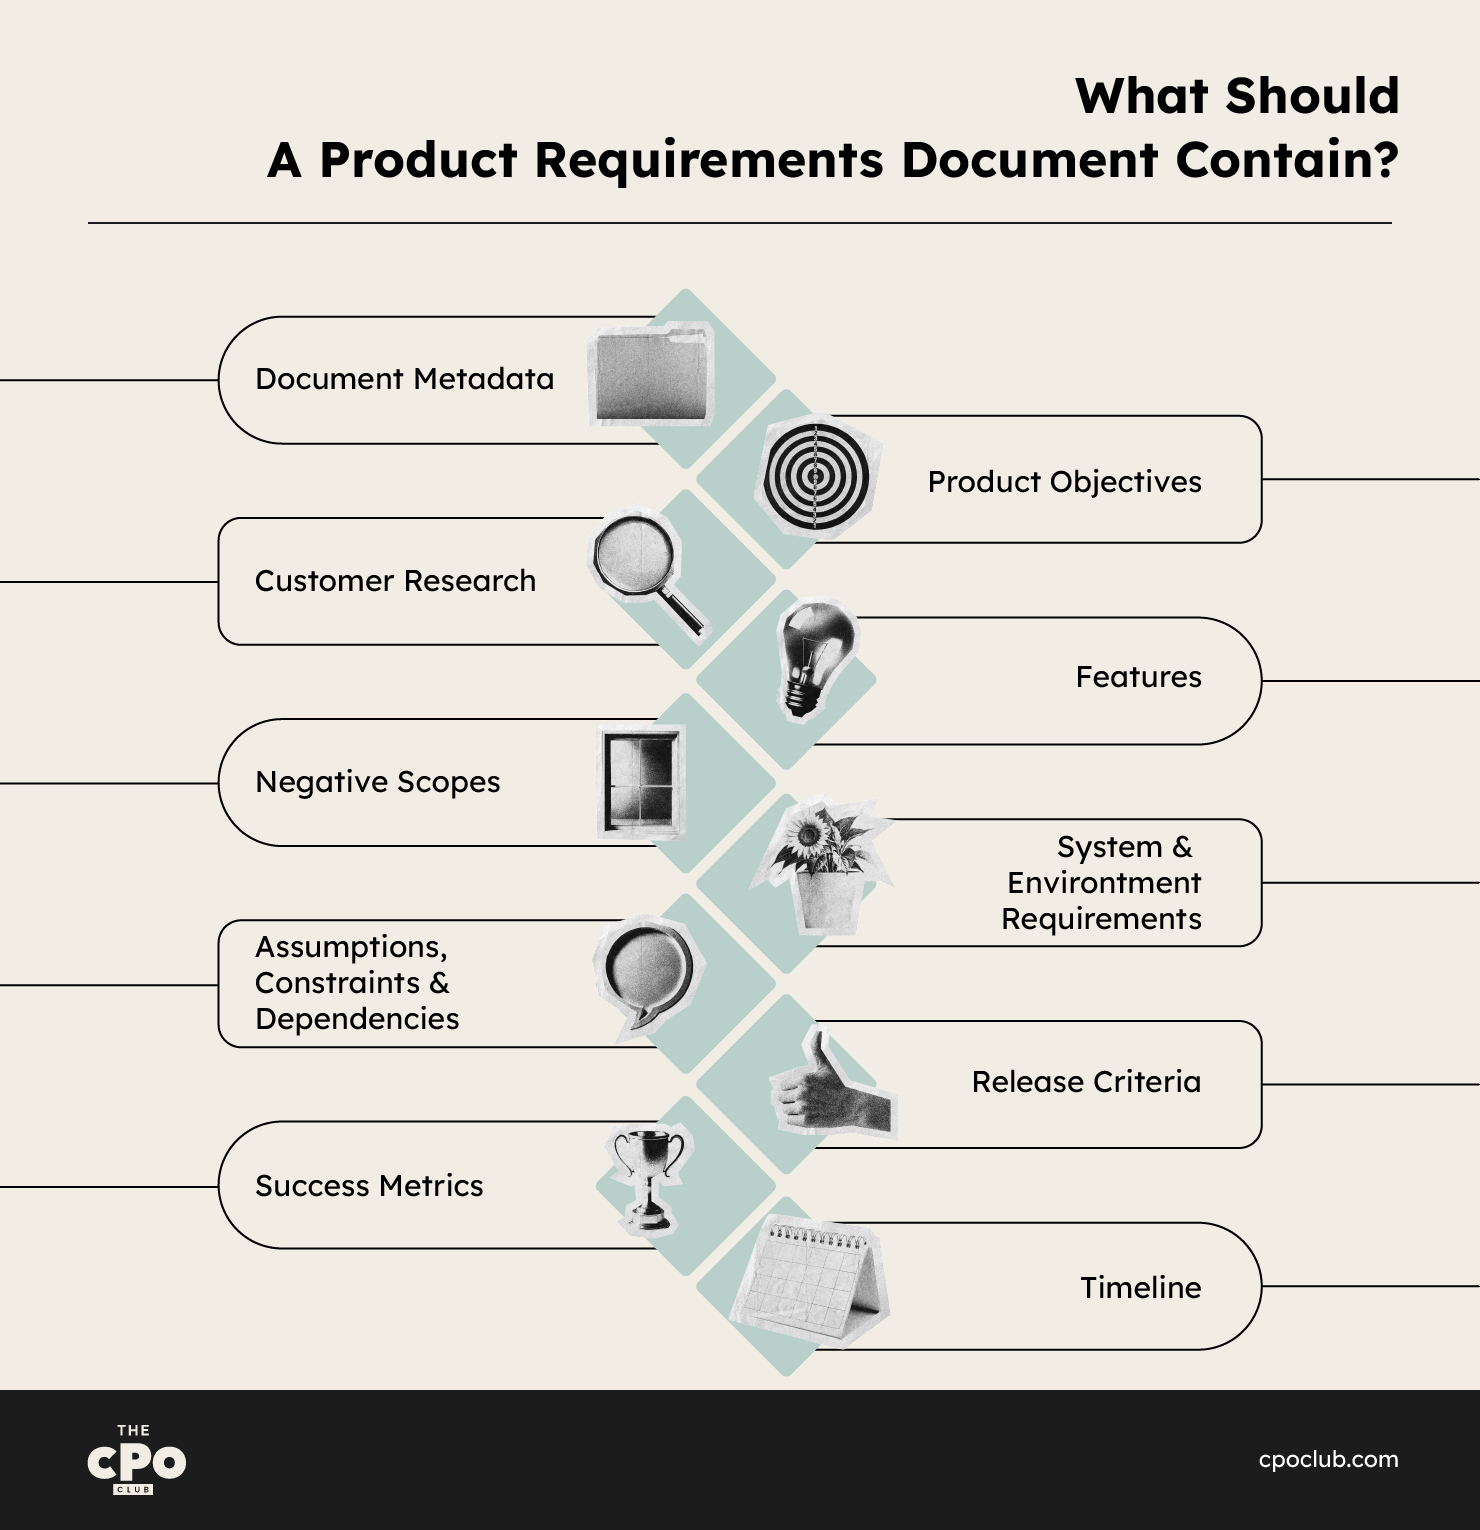
In terms of the structure, a typical PRD should contain the following:
- Document metadata such as edit date, version history, etc.
- Product objectives that you want to accomplish.
- Customer research data, such as target personas.
- Prioritized list of features that you want to build.
- Negative scope of the features you will not build.
- Core metrics for testing these hypotheses.
- Core hypotheses that your features test.
- Release strategy showing when and how the feature will ship.
While most PRDs will contain these elements, it’s absolutely fine to add or remove elements based on your needs and the reality of your product.
What’s an Example of a Product Requirements Document?
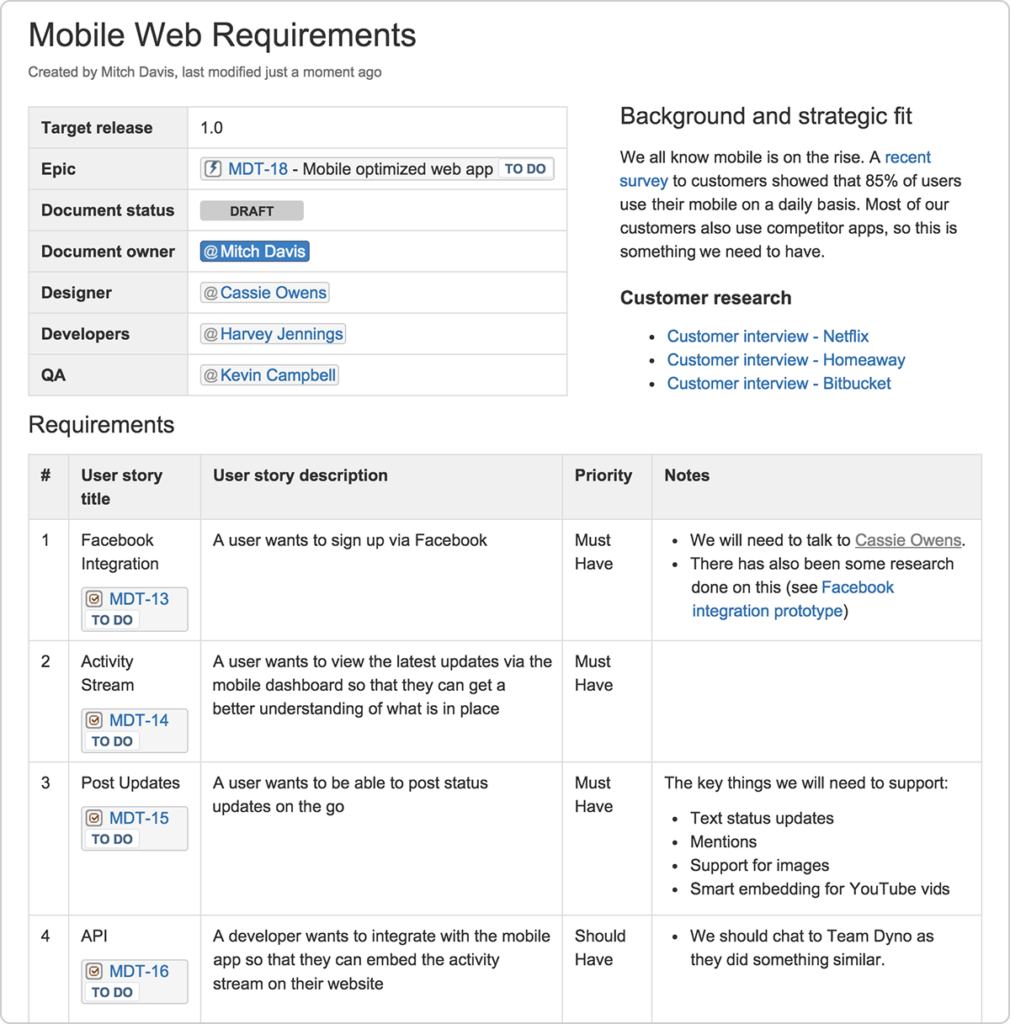
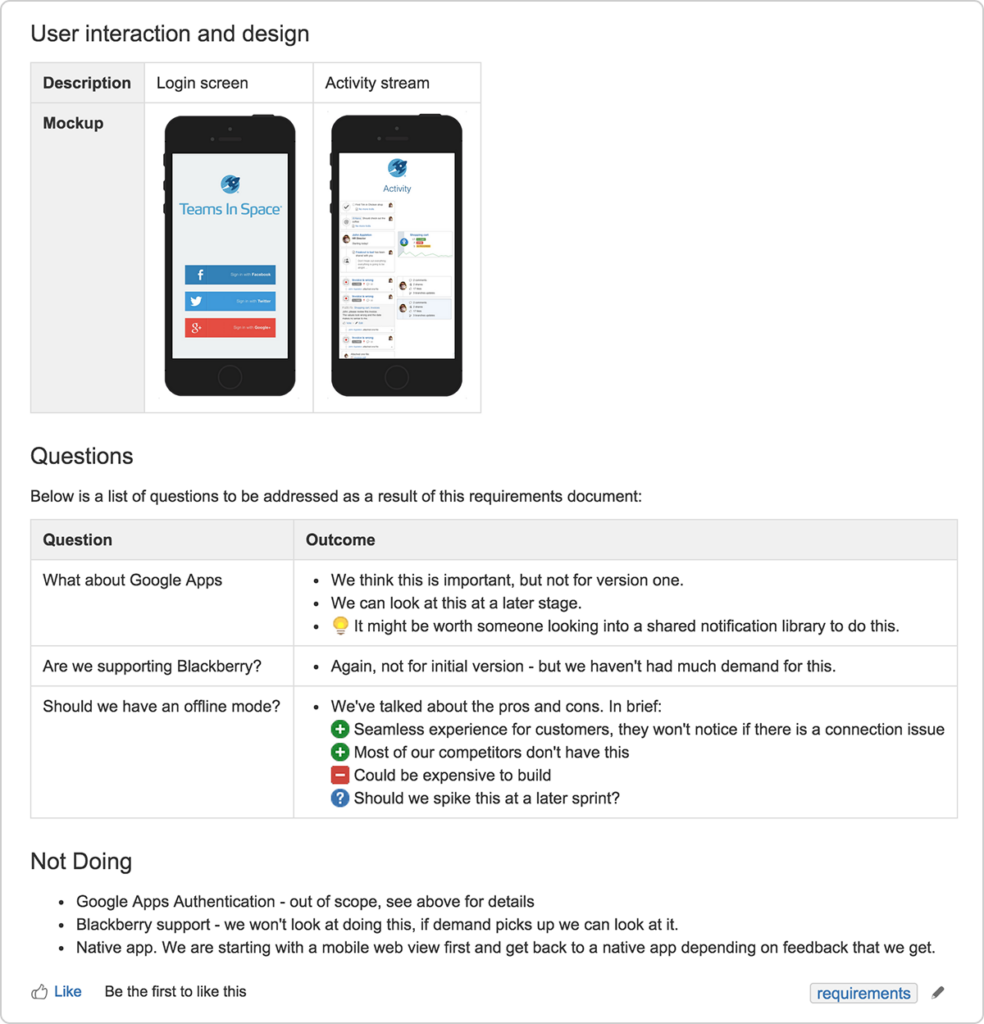
Sometimes, it’s easier to understand what needs to be included in a document using a visual, so here’s an example of a completed PRD.
How to Write a Product Requirements Document (With a Little Help From LLMs)
Even with all the information we’ve already shared, putting together your first PRD can feel daunting. Don’t worry; we’ve got you! Here’s our six-step checklist for creating a rock-solid PRD. Plus, we’ve even thrown in a template to help you capture all the right information.
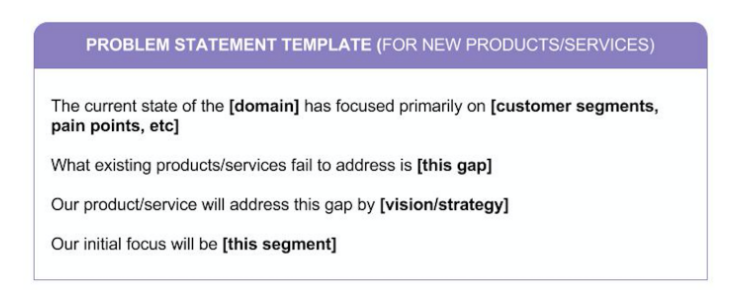
Step 1: Get clear on the problem
Before doing anything else, it’s crucial that you’re clear on the problem you’re trying to solve, and the user personas you're trying to solve it for. This will influence exactly what functionality you include in the product and the features you prioritize for the release.
The Business Requirements Document should contain a needs statement detailing the problem faced and how the product should act to solve that problem. Reviewing the BRD and getting clear on exactly what the business needs from the product is important before drafting the PRD.
Step 2: Review market and user research
By the time you’re writing a PRD, you should already have your market research and personas ready. But sometimes the persona for a specific feature can differ from the general one you have. So, if it’s the case for you, let’s generate a persona description using this LLM prompt:
Here are transcripts from several product discovery interviews I have conducted with my users.

{upload your transcripts as txt files in this message}

Please go through these transcripts, analyze the common traits among them and generate a persona description following this structure (delimited by XML tags):


<USER_PERSONA_STRUCTURE>

1. Name:

(Fictional but realistic, e.g., Anna, the Busy Accountant)

2. Demographics:

	•	Age
	•	Gender (optional)
	•	Location
	•	Occupation

3. Goals:
	•	Primary goal(s) they want to achieve
	•	Secondary or related goals

4. Challenges/Pain Points:
	•	Key obstacles they face
	•	Frustrations or needs

5. Behaviors:
	•	Relevant habits, preferences, usage patterns

6. Preferred Tools/Platforms:
	•	Apps, websites, devices they often use

7. A Short Quote (Optional but Powerful):

One sentence capturing how they feel about their needs.

(Example: “I just want a system that saves me time without needing a manual.”)

</USER_PERSONA_STRUCTURE>


Example:

Name: Anna, the Busy Accountant

Demographics: 34 years old, lives in Chicago, CPA at a small firm

Goals: Finish client work faster, minimize manual admin tasks

Challenges: Too much paperwork, clunky software, time pressure

Behaviors: Works late hours during tax season, prefers simple, mobile-accessible apps

Preferred Tools: QuickBooks, Slack, Google Drive

Quote: “If it’s not simple, I don’t have time for it.”


Requirements for personal generation:

- please only use the information provided in the transcripts and do not make up information not present there.

- only use characteristics that are present in at least 80% of the transcripts I have shared with you.

- if you don't find enough information for a specific persona data element, leave it blank.
As a result, you will get a persona description that you can include into your product requirements document. But please double-check the LLM-generated content as it might have mistakes.
Step 3: Engage functional stakeholders
As we’ve mentioned, the best PRDs are developed collaboratively. Call a cross-functional meeting to seek input from different areas of the business to inform your requirements document.
This is a great opportunity for stakeholders to call out any assumptions, raise concerns about risks or constraints, and note any dependencies that could impact the product development process.
Step 4: Define Your Core Hypothesis and Product Metrics
No matter the type of feature you build, you’re expecting it to have some kind of an impact on your users or your company. To be able to measure that impact and see if your feature was a success or not, you need to first define a testable hypothesis.
My favorite format of a hypothesis is called If-then-because. It looks like this:
We believe that, if we [develop feature A], then [core metric B] will [increase/decrease] by [C amount] because [explain why].
For example, if I’m working on Spotify, it can look like this.
We believe that, if we develop morning routine playlists, then daily retention will increase by 5% because more people will use Spotify every day in the morning.
To automate this process with AI, simply explain in your own words what you expect the feature to achieve and ask it to formulate it in a If-then-because format. Here’s the prompt:
{insert your feature explanation here}

Please formulate a hypothesis using the if-then-because format.

Requirements:

- The hypothesis should be no longer than 100 words.

- Please only use the context I have provided.
With the hypothesis ready, you also need to define the product metrics you want to measure for that feature.
Obviously, you want to measure the metric your hypothesis is targeting (retention in the Spotify case). But there are also 3 key metrics you need for any feature:
- Adoption
- Retention
- Engagement
You can ask the AI to help you pick the right metric along with the events that your analytics tool should fire to measure these metrics. Here’s a prompt you can use for that.
{insert your feature explanation here}

Here's the hypothesis:

{insert your hypothesis from previous prompt here}

Please suggest metrics to track along with their event triggers. Please suggest metrics in these categories:

- Adoption

- Retention

- Engagement

Please consider that I will add these metrics into the Product Requirements Document for the feature I described.
In our Spotify example, the metrics would be the following:
Adoption: % of users who started a morning playlist. Event trigger is the moment the user starts the playlist.
Retention: % of users who have been using the morning playlist for 7, 14, and 30 days. Event trigger is the moment the user starts the playlist.
Engagement: Average minutes users have listened to the playlist. Event triggers are starting the playlist and stopping it.
Step 5: Get Your Designs Ready
No PRD is complete without design—if the feature needs it. Some teams attach final designs; others prefer to include only high-level concepts or a prototype, refining details later with the team.
Both approaches have trade-offs. Final designs offer clarity but slow PRD delivery. Early concepts accelerate handoff but risk misinterpretation and rework.
The sweet spot? Share designs that cover the core user journey and major states, skipping minor elements like empty or error states. Luckily, modern UX design tools let you get both a prototype and a design at the same time.
With this, you deliver your design and PRD to your team sooner, while minimizing the risk of ambiguity.
Step 6: Break Your Idea Down Into Independent Features
I don’t think I need to tell the seasoned PMs about the benefits of breaking a large feature down to smaller bite-sized user stories. If you’re new to product management, here are a few:
- Small stories are easier to estimate for your team.
- They are easier to deliver since the team can focus on one story at a time and complete them without hassle.
- Faster to test as your QAs can test one story while the team is making the next one - parallelizing the work of testers and developers.
- Give you the flexibility of removing less important ones from the scope to speed up delivery.
Breaking the feature down is great, but it’s only half the battle. The second half is prioritizing them. Not all stories are created equal. Some parts of your feature represent the core journey while others are nice-to-have additions. In our Spotify example, here’s what the list of important and not important stories will look like using the MoSCoW prioritization method.
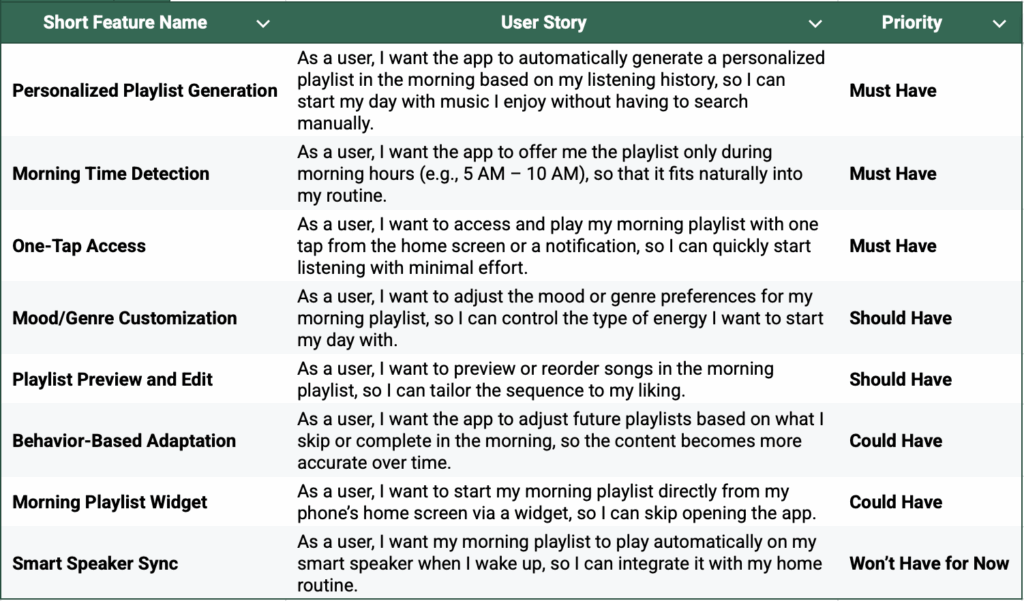
Looking at the list here, it’s clear that the ability for users to see the morning playlist and access it with a single tap is much more important than the ability to edit the playlist.
So, if you face a time constraint and need to ship fast, you can remove the editing user story from your release and move to future releases.
Some people make this list on a spreadsheet. But I recommend using a specialized product roadmap tool as it also comes with native prioritization and integration features.
Step 7: Define The Release Strategy
Real life releases are rarely straightforward - finished the entire feature and shipped it to production. Most of the time, a release of a large feature (worthy of its own PRD) is a multi-phase process that can potentially include the following:
- Developing the MVP version containing only the must-have stories and doing a beta release.
- Gathering feedback, fixing the issues, adding the should-have stories and preparing for production release.
- Doing a gradual release to production in multiple phases.
- Adding the could-have features if you see that there’s a need in them.
To speed up the process of creating a release strategy, you can ask your LLM to help you using this prompt.
I want to build {insert your feature explanation here}.

Here's a list of user stories for that feature prioritized using MoSCoW:

{insert the feature list from previous step here}

Please create a release strategy for it. The strategy should:

- Group the features in the list above into multiple releases, including the MVP version.

- If you find it necessary, have a beta release phase

- If you find it necessary, have a gradual rollout with 2 or more phases including their timelines, percentages of users to rollout to in phases, as well as the description of the types of users to be included in each rollout phase.

Criteria for deciding if Beta Release is needed (in CSV format, delimited by XML tags):

<BETA_RELEASE_CRITERIA>

Criterion,Beta Release,Direct Production Release

User Risk,Medium to High – uncertain user impact or potential regressions,Low – feature is well tested and low risk to users

Feature Maturity,MVP or experimental; may lack polish or complete UX,Fully developed and stable

Feedback Need,High – early user feedback is critical to validate direction or UX choices,Low – confident in feature value and usability

QA Confidence,Moderate – needs real-world testing to supplement internal QA,High – thoroughly tested internally

Business Impact Uncertainty,Unclear if it will move key KPIs (retention, conversion, etc.),Expected positive or neutral impact, backed by prior validation

</BETA_RELEASE_CRITERIA>

Criteria for deciding if Gradual Release is needed (in CSV format, delimited by XML tags):

<GRADUAL_RELEASE_CRITERIA>

Criterion,Gradual Release,Full Immediate Release

User Risk,High – Feature might cause regressions, bugs, or confusion if rolled out widely,Low – Minimal user disruption even if unexpected issues occur

System Load Risk,High – Feature may increase server or backend load; unknown scaling behavior,Low – Performance is validated under expected peak conditions

Change Scope,Large – Touches critical paths, core UX flows, or backend logic,Small – Self-contained, optional, or limited in scope

Monitoring Readiness,Metrics, alerts, and logs are ready to detect issues in small cohorts,Not essential – low risk of silent failures or hard-to-detect regressions

Rollback Complexity,High – Hard to revert once fully released (e.g., schema migrations, data changes),Low – Easy to disable or fix if something breaks

</GRADUAL_RELEASE_CRITERIA>
Most likely, the timelines that the LLM gave you would be unrealistic. So, feel free to change them based on your team’s capacity and your product goals.
Step 8: Draft the PRD
Using the information gathered in the previous step, you can now draft the PRD.
Again, to save time, we will ask our LLM of choice to do it for us using this prompt.
Please create a Product Requirements Document using this structure (delimited by XML tags):


<PRD_STRUCTURE>

1. Objective

    - Vision
    - Goals
    - Persona(s)

2. Features (table with the following columns)

    - User Story short name
    - User Story short description
    - User Story priority

3. User Flow and Design

    - Leave a placeholder text here "please insert your user journey and design links here"

4. Release Strategy

    - Release phases with scope. Include beta release if I have provided one in the release context below
    - gradual rollout strategy if I have provided one in the release context below. If gradual rollout is relevant, include percentages of users to rollout to in phases, as well as the description of the types of users to be included in each rollout phase.

5. Analytics

    - Core hypotheses
(table containing these columns)
    - Metric
    - Target change
    - Event trigger

</PRD_STRUCTURE>


Please use these pieces of context for generating the PRD (delimited by XML tags):

<USER_PERSONAS>

{insert persona description here}

</USER_PERSONAS>


<CORE_HYPOTHESIS>

{copy and paste core hypothesis from previous steps here}

</CORE_HYPOTHESIS>


<KEY_METRICS>

{copy and paste key metrics list from previous steps here}

</KEY_METRICS>


<USER_STORIES>

{copy and paste user story list from previous steps here}

</USER_STORIES>


<RELEASE_STRATEGY>

{copy and paste release strategy from previous steps here}

</RELEASE_STRATEGY>
All you have left to do is quickly review the PRD content. Specifically, pay attention to vision and goals since the LLM will try to generate it based on your feature descriptions. If you don’t like, them feel free to edit.
Step 9: Secure sign-off
Once the PRD is complete, make sure that it is signed off by the customer. For an internal project, this might be the project sponsor or senior leadership team. This helps ensure business alignment and support for the product development process.
Having the release criteria accepted is of key importance so there are no misunderstandings about exactly what the product will be able to do in terms of functionality, usability, and performance at the end of the development process.
Step 10: Share and communicate
After the PRD has been signed off, share where the PRD is going to be stored and communicate the process for accessing, viewing, and changing the PRD during the product development process.
The finalized PRD should be used as a reference point throughout the project and can be updated in real-time if requirements change. However, there should always be a way to identify what was originally agreed and any changes made should be well-documented and accompanied by a reason for the change.
Best practices for product requirements documents
Hopefully, we’ve cleared up exactly what a PRD should contain, so let’s dig into some best practices for putting it together.
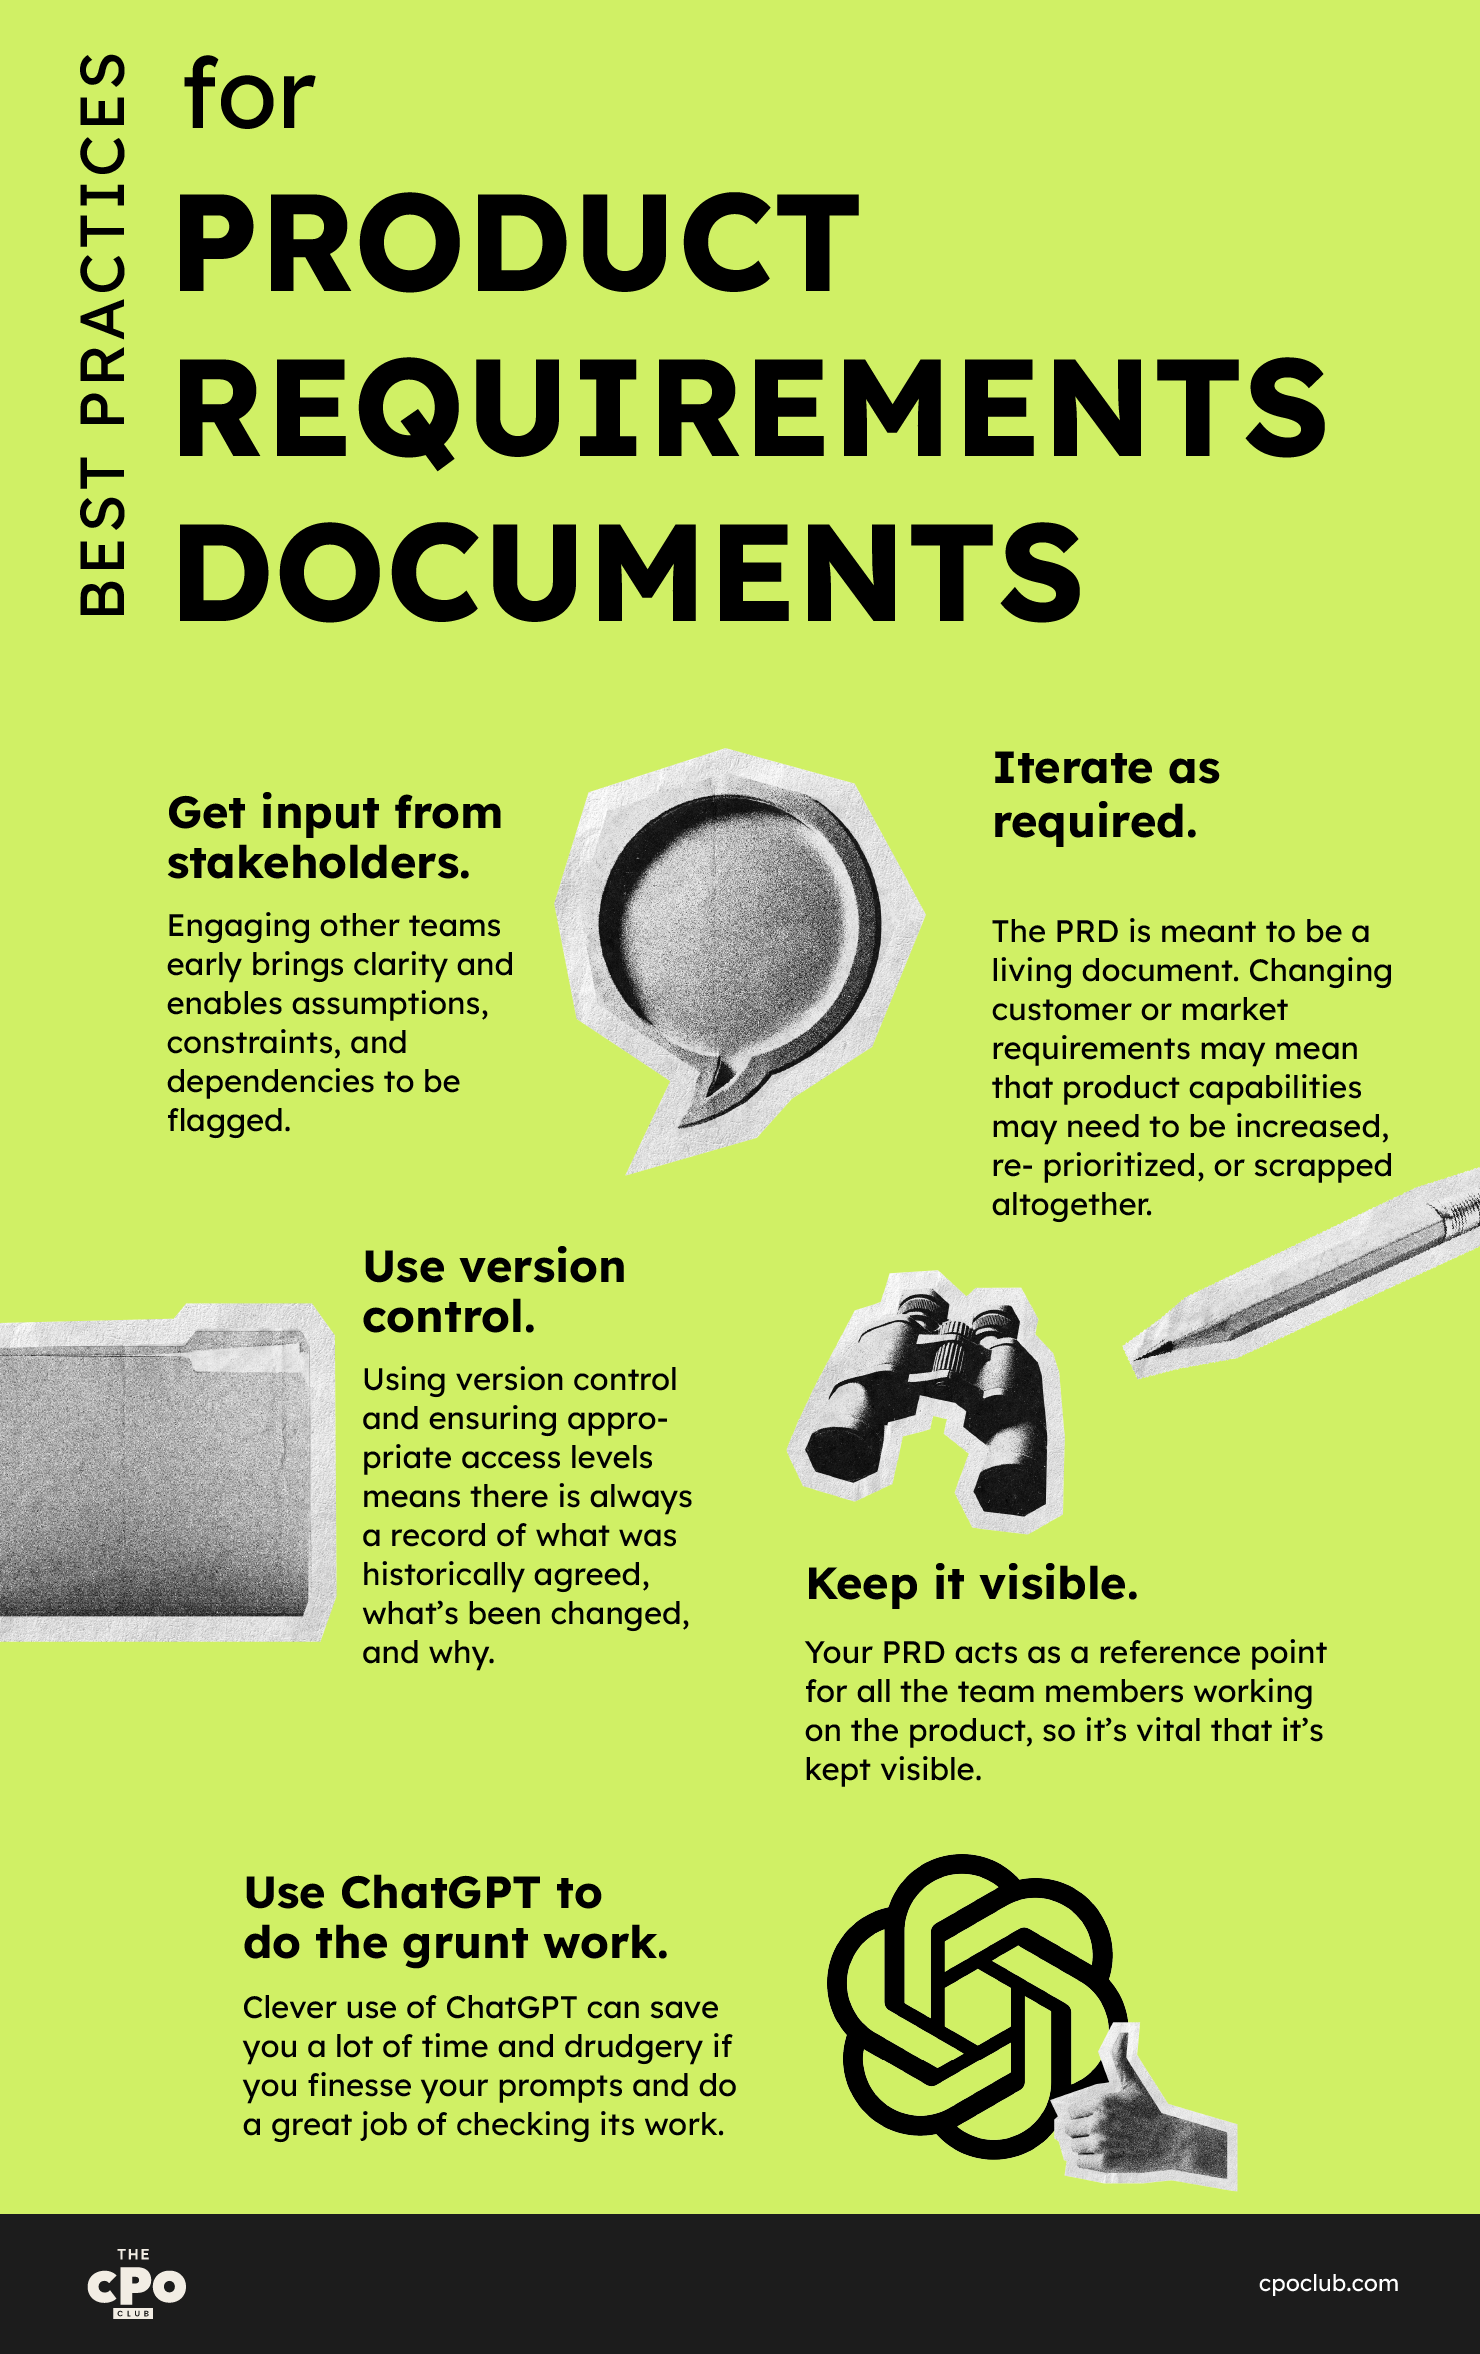
- Get input from stakeholders. The best PRDs are created with input from all key stakeholders. There’s no point in creating a long list of critical functionality only for engineers to explain it’s not supportable. Engaging other teams early brings clarity and enables assumptions, constraints, and dependencies to be flagged.
- Take advantage of modern tools. Lucky for us, there are many software-oriented documentation tools that help us with PRD creation and management. Notion, for instance, includes ready PRD templates that you can use along with tables with rich formatting where you can list your assumptions or features. Confluence, on the other hand, comes with native Jira and BitBucket integration - letting you embed tasks and releases into the document.
- Iterate as required. The PRD is meant to be a living document. Changing customer or market requirements may mean that product capabilities may need to be increased, re-prioritized, or scrapped altogether. The timeline may need to be compressed to ensure a first-to-market position or extended if an assumption isn’t realized.
- Use version control. While it’s important that the PRD is reviewed and amended as needed, it’s critical that the product manager can always refer to what was originally agreed. Using version control and ensuring appropriate access levels means there is always a record of what was historically agreed, what’s been changed, and why.
- Keep it visible. A PRD isn’t a one-and-done document that’s thrown into a desk drawer after the project planning meeting—it's a critical asset for project management. As we’ve discussed, your PRD acts as a reference point for all the team members working on the product, so it’s vital that it’s kept visible.
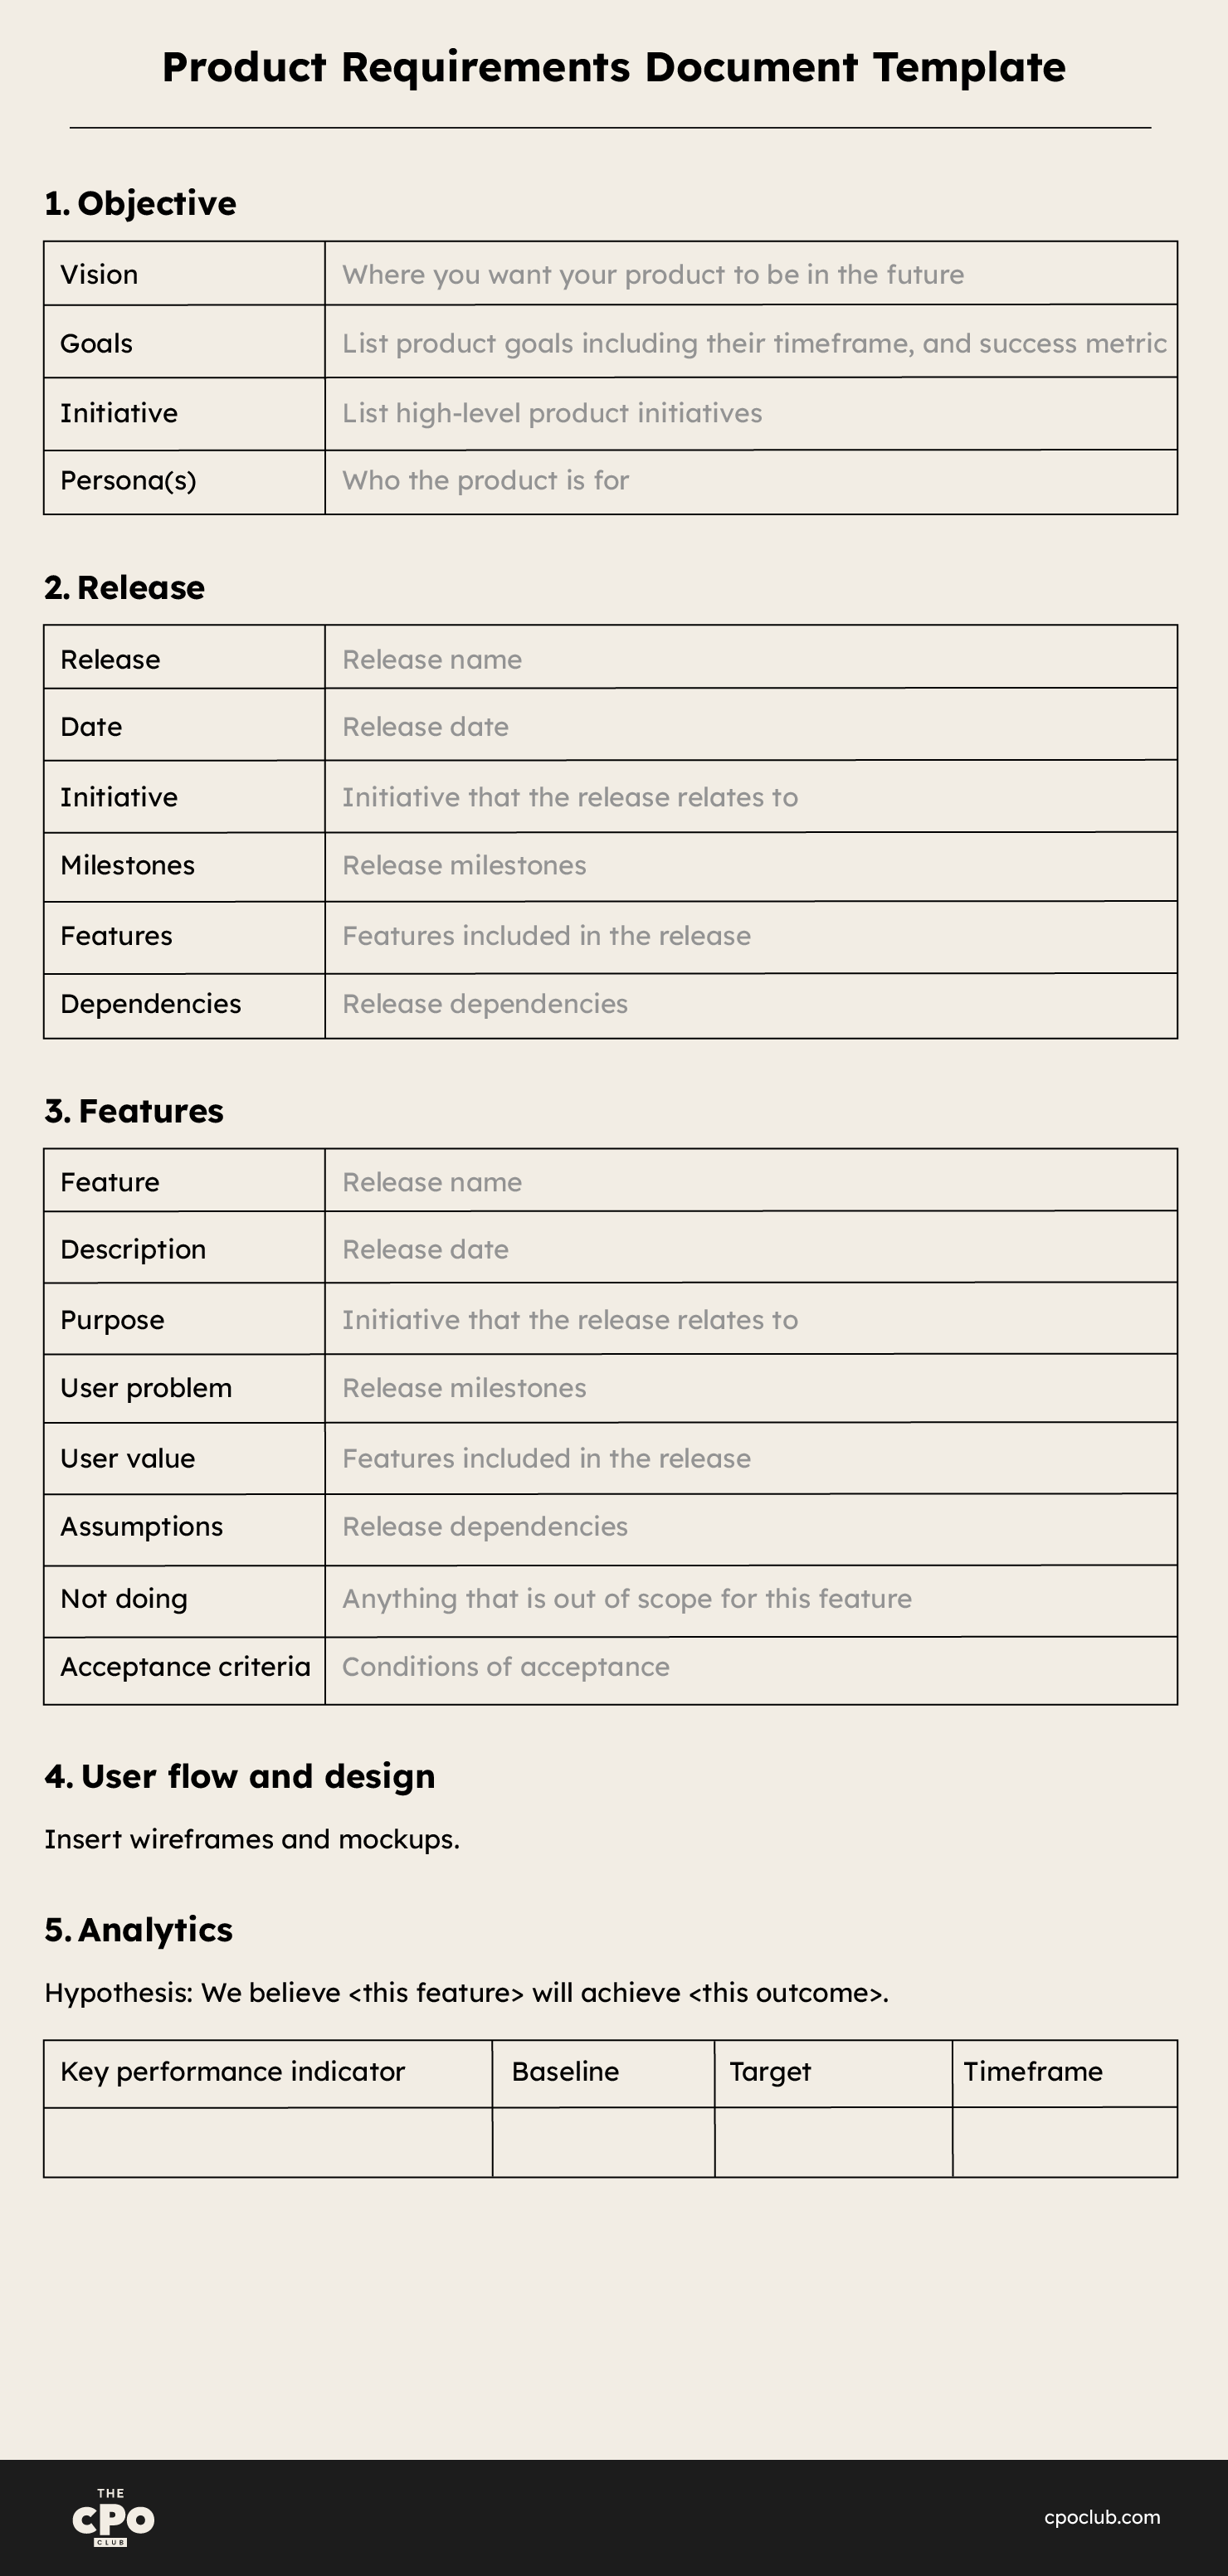
Product Requirements Document Template
To wrap this up, here’s a PRD template you can use to get started drafting your first product requirements document today.
Make sure you customize it to fit the needs of your project, adding and removing sections as necessary to offer clarity.
Product Requirements Document Template
Get Clarity On Your Product Requirements Today
If you've faithfully plowed through the information above, you’re well on your way to creating a stellar Product Requirements Document.
While it can take a little time upfront, the benefits are worth the effort, and our example template can help you plan and develop your next great product.
We’re a community of product people (just like you!), so if you found this info helpful, subscribe to our newsletter. We’ll keep you up to date with useful articles, how-to guides, tool reviews, and more.
